Wednesday 28 October 2015

Bottom Up Integration testing

 Bottom Up Integration testing approach is the opposite to top down where lower level components are tested first and proceed upwards to the higher level components. In this approach when highest level components are developed they are integrated with the lower level components. It is known as bottom-up or lowers to highest approach. There is possibility of missing highest level components which affects the integration process. The main advantage of the Bottom Up approach is that defects are more easily found.
In this situation to make the integration possible developer develop the temporary dummy program that is utilised in place of missing module known as ‘DRIVER’.
Bottom Up Integration testing


Sunday 25 October 2015

What is Sanity testing and how to do a Sanity Testing?

Sanity testing is the testing to check major functionalities of the application to validate whether the application is ready for testing or not. It is a rapid test to validate whether a particular application or software produces the desired results or not.  It is not in-depth level testing. Before undergoing the Sanity testing software has to pass the other kinds of testing. Sanity testing is more depth than Smoke testing.
Sanity testing usually includes a suite of core test cases of basic GUI functionality to demonstrate connectivity to application server, database, printers etc.
When a new build is obtained after fixing the some minor issues then instead of doing complete regression testing sanity is performed on that build. In general words Sanity testing is a subset of regression testing. Sanity testing is performed after thorough regression testing is completed, to ensure that any defect fixes does not break the core functionality of the product.
It is performed towards the end of the product release phase such as before Alpha or Beta testing. Sanity testing is performed with an objective to verify that requirements are met on not. Sanity test is normally unscripted. Sanity testing is a subset of Acceptance testing.
 Sanity testing is the term which is correlated to Smoke testing but they are diverse. One similarity between these two is that both are used as criteria for accepting or rejecting the new build.
                       Sanity Testing
If sanity test cases fail then deployed build is rejected because if the deployed build is not having the required changes then there is no point of doing regression testing on the deployed build. Smoke is being part of regression testing which validates the crucial functionality whereas sanity testing is part of acceptance testing which validates whether the newly added functionality is working or not. 
Usually smoke is performed on relatively unstable build or product while sanity testing is done on the relatively stable build or product. Moreover generally only one of them is performed but if required both can be performed. When both need to perform then Smoke testing is performed first following Sanity testing.
Examples of Sanity testing:
  1. Database connectivity among other modules of the application or software
  2. Identification of missing objects
  3. Check for missing errors from previous build
  4. Testing on the application servers
  5. Slow function issues
  6. Database crash issues
  7. System termination
Sanity testing factors:
  1. Environment issues 
       E.g. Application closing, application getting hang, unable to launch URL
  1. Exceptional errors
      E.g. java.io.exception (some source code will be displayed)
  1. Urgent severity defects
When to perform Sanity Testing:
After receiving Software build with the minor fixes in code or functionality and there is no enough time for in-depth testing, Sanity testing is performed to check whether the defects reported in previously build are fixed and it is not impacting any previously working functionality. The objective of Sanity testing to validate the planned functionality is working as expected.
Advantages:
  • Provides faster results
  • Saves time
  • Requires less preparation time as they are unscripted
Disadvantages:
  • Defect reproducibility is difficult as these are unscripted
  • Does not cover testing of entire application in-depth

Wednesday 21 October 2015

Ad-hoc testing

Ad-hoc testing is unscripted random software testing method or testing types. Ad-hoc testing is also known as Expert testing. Ad-hoc testing is sometimes mixed up with other testing types such as exploratory testing, monkey testing and negative testing. Ideally it is performed only once unless there are some defects in application or system. Ad-hoc testing is effective testing technique and is done without any formal test plan, test cases, procedures or documentation.In structured testing, while testing any application or software, testers have to follow a certain scenario for executing test cases. But in Ad-hoc testing, there are not any specific scenarios or test cases for execution. Tester is allowed to execute any scenario or test case to explore the system or application.
Ad-hoc testing can be accomplished with the testing technique called "Error Guessing". Error guessing can be done by the tester having abundant experience on the system to "guess" the most likely source of errors.Ad-hoc testing is performed based on knowledge and experience of tester about the system being tested. Experienced testers can find many defects through ad-hoc testing as they know the common scenarios which cause the defects in application or software. Testers are allowed to improvise the test to find additional defects. The objective of ad-hoc testing is to break the system’s functionality and find defects in the application.
When to perform Ad-hoc testing?
Ad-hoc testing is least formal testing method with the goal of finding defects with any means possible.Ad-hoc testing can be performed anytime in the beginning, middle or towards the end of STLC. It is performed when there is limited time to do elaborates testing. It is usually performed after the formal test execution.
Ad-hoc testing examples:
  1. Navigating through the work flow and using browser "Back" button to ensure user is correctly being navigated to the correct page that the user previously visited.
  2. Saving a form twice for the same action.  For example, if user was to register a user on a website after filling the required fields, click on the Register button multiple times and then check the database to see if multiple records or single record get created.
  3. Cross-browser testing. For more testing coverage, we have to perform testing on variety of browsers/OS, the more chances of finding defects.
  4. Trying to enter and save data that is outside the provided range or boundary values.
  5. Concurrent transactions or actions that do the exact same steps of a given functionality by using 2 different sessions on different machines.  For example, if an application requires tester to create a table name that is unique; how will it handle if you were to try to create a table with the same name on two distinct sessions? Validating to eliminate redundancy or duplicate data caused by concurrent transaction.
  6. How will the system will perform when Java Script option is disabled? System should allow user to successfully operate the site using both Java Script enabled and disabled in Internet explorer, Chrome,Firebox,Safari.
  7. Copying the current browser session URL and pasting it in another browser or editing the values in the URL to gain access to certain events that user normally would not be able to do it via User Interface. An URL which is being used by an unauthenticated or unauthorized user should be handled elegantly without exposing or violating security.
Types of Ad-hoc testing:
  1. Buddy Testing:Two buddies, each one from development and testing team respectively work mutually on application or software to find the defects in same piece of module. Buddy testing helps the development team to make design level changes early and helps testing team to develop better suite of test cases. It is usually performed after successful completion of unit testing.
  2. Pair Testing:It works on four eyes principle (two-man rule or the two-person rule).The word pair stands for twosome or couple. Two testers are assigned to perform testing on same piece of module to find defects. They share the ideas and work. They can divide the work such as one can perform the testing whereas other can make a note of findings or defects.Its effectiveness depends upon the ability, integrity and persistence of the individuals involved.
  3. Monkey Testing:Testing is performed in a random fashion without any test cases with an objective to break the application or system.
Advantages:
  1. Not bounded to specific test scenarios or test cases
  2. Effective when there is a time limitation for testing the system or application under test
  3. It Provides quick results
  4. Testers can find more defects than formal testing techniques
  5. Helps to increase code coverage benefits
Disadvantages:
  1. Lack of documentation
  2. Unstructured or unorganized testing
  3. No reference documents to guide to testers
  4. Possibility of not covering of major functionality
  5. Need skilled testers to perform testing

Sunday 18 October 2015

Smoke testing

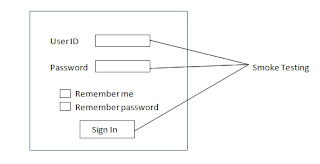
Smoke testing is an end-to-end testing which validate the stability of new build by checking the crucial functionality of the application or software under test. Smoke testing is also known as Build Verification Test (BVT). The objective of smoke testing is to determine whether the new software build is stable or not so that the build could be used for detailed testing by the testing team and further work by development team. If the build passes Smoke test (build is stable) then build could be used by testing team and development team.  If the build fails Smoke testing (build is not stable) then the build is rejected to the development team to fix the build issues and create a new build.
 It is done towards the beginning of the testing cycle. It is first level of testing on a newly released build of application at testing team level to check the main functionality of the application and is performed before the detailed functional or regression tests are executed.
It is usually preferred when some minor issues with the application or software and a new build is obtained for testing after fixing of issues instead of full regression, a most crucial and important test cases is selected which is used to find issues in particular functionality.
Smoke testing is one type of integration testing because it involves end-to-end testing of crucial functionality of application or software without going into the finer details. Smoke test is scripted i.e. either manual test cases or automated scripts for it.
build verification test
                               Smoke Testing

Smoke testing is usually performed by testing team but in certain situations, it can be done by development team. When development team checks the stability, it is deploy to testing only if the build is stable.  In other case, whenever there is new build deployment to testing environment then the testing first performs the smoke test and depending upon the results of Smoke test decides to accept or reject the build.

Smoke testing plays a crucial role in Agile projects. Generally Agile projects have one build per day. But, few critical releases might have more than one build per day. As there as frequent build deployments in Agile, testing team needs to perform Smoke testing covering major areas of application without going into deep before starting detailed level testing. When a build with some functionality implemented or with some issues fixed is deployed to testing environment to check if the new build is stable and functionality is implemented correctly. Meanwhile this period, the development team implements some other functionality or fixes few more issues and deploy the new build in testing environment for testing.
When to perform Smoke testing:
Smoke testing is performed immediately after the new build deployment. It is the first test on the new build followed by other kind of functional testing, user acceptance and regression testing etc.
Advantages of Smoke testing:
  • Saves time and effort as major issues get detected early in the testing cycle
  • Saving effort and time leads to saving cost of testing the application
  • Improve quality as issues get identified and corrected early in software test cycle
  • Reduces the integration as end-to-end testing is performed 

Wednesday 14 October 2015

Exploratory Testing

Exploratory testing is a testing approach of simultaneous learning, test design and test execution. The simple definition of exploratory testing is test case design and test case execution is performed in parallel. It is an approach of testing the software without any specific plans and schedules. In structured or scripted testing, tester designs test cases first and afterwards proceed with test case execution. On the converse, exploratory testing is concurrent process of test case design and test case execution all done at the same time. In this approach the testers don’t have test cases or test plan documents available to test the application.
In Exploratory testing, testers understand the application first by exploring the application and based on their understanding they come up with the test scenarios or test cases. The testers spend minimal efforts on planning and maximum on test execution. Tester takes help of the current test execution result to decide what can be tested next?. In other words, the action tester needs to perform next is governed by what tester is doing currently.
In Testers can find different kinds of defects or bugs as they have freedom in testing. The quality of identified defect depends on the tester experience and skills. The experienced and skilled tester can identify the more quality defects compared to less experienced and skilled tester.
When to use Exploratory testing:
  • Requirement documents are not available or partially available
  • Application needs to be tested in early SDLC
  • Testing time frame is limited
  • Experienced and skilled testers are available
  • Critical application testing
  • Focus is on identifying the defects without spending much time on test planning and test designing 
Advantages:
  • No pre-planning is required
  • No preparation is required
  • Saves time as test design and execution is performed in parallel
  • Uncover bugs which are normally missed by other testing techniques
Disadvantages:
  • It is purely depends on the testers experience and skills
  • Need in-depth domain or application knowledge
  • Not suitable for long execution time
  • Difficult to reproduce the defect as test cases are not available


Sunday 11 October 2015

Top-down Integration testing

Top-down Integration testing this approach when lower level components are developed they are integrated with highest level components. It is known as top down or top to bottom approach. Top-down integration testing mainly needs for the testing team to identify what is important and what is least important modules, then the most important modules are worked on first. In this approach there is a possibility that a lower level module is missing or not yet developed which affect the integration between the other modules. Top Down approach is like a Binary tree where testing starts from top to roots.
In this situation to make the integration possible developer develop the temporary dummy program that is utilized in place of missing module known as ‘STUB’ for the smooth running of integration testing.
In Top-down Integration testing approach the decision making occurs at the upper level in the hierarchy and encountered first. The main advantage of the Top Down approach it is easier to find a missing branch link.
The problem occurs in this hierarchy when processing the lower level components to adequately test highest levels. As stubs are used to replace lower level components at the beginning of top down approach; no significant data can flow between the modules. Lower level modules may not be tested as thoroughly as the upper level modules.
Top down Intergration testing
Top-down Integration testing


Thursday 8 October 2015

Top 5 differences between Pilot and Beta testing

Pilot testing is a verification of system under real-time operating conditions. Pilot testing consist of allowing a group of users access the system and implementing their feedback before it is completed and deployed to the end user. The objective of Pilot testing is done to avoid the high-level Disasters. Defects found in Pilot testing have to be fixed as soon as possible.

To understand the Beta testing please read the User Acceptance Testing post.

Pilot testing and Beta testing seems to be confusing for a lot of testers. Below are the few points which will help you to understand the difference easily.

Pilot Testing
Beta Testing
Pilot testing is done to collect feedback to improve the quality of the application and avoid the high-level Disasters
Beta testing is done to make sure system meet the user requirements
Pilot Testing is performed in the Production environment
Beta Testing is performed in the Real-time environment
Pilot testing takes place before deployment of the system i.e. performed before the Beta testing
Beta testing takes place at last in development cycle i.e. performed after successful Pilot testing
Defects found in Pilot testing have to be fixed as soon as possible
Defects found in Beta testing does not get fixed immediately
Pilot testing is carried out by a group of selected users
Beta testing is carried out by all end users


Sunday 4 October 2015

Top 5 differences between Stubs and Driver

The concept of Drivers and Stubs is very important to understand the Integration or Incremental testing. Top down and Bottom up are approaches used in integration testing. Drivers are used for the bottom-up approach where as Stubs are used in top-down approach. Drivers are modules that run the components that are being tested.  Stub is a replacement of sorts for a component, which is used to develop and test a component that it calls.
STUBS:
In Top-down approach when lower level components are developed, they are integrated with highest level components. There is a possibility that a lower level module is missing or not yet developed which affect the integration between the other modules.
In this situation to make the integration possible developer develop the temporary dummy program that is utilized in place of missing module known as ‘STUB’ for the smooth running.
In top-down approach, the decision making occurs at the upper level in the hierarchy and encountered first. The problem occurs in this hierarchy when processing the low level or lower level components to adequately test top or highest levels. As stubs are used to replace lower level components at the beginning of top-down approach; no significant data can flow between the modules.
stubs
STUBS
DRIVER:
Bottom-up approach is the opposite of top-down where lower level components are tested first and proceed upwards to the higher level components. In this approach when highest level components are developed they are integrated with the lower level components. There is possibility of missing highest level components which affect the integration process.

In this situation to make the integration possible developer develop the temporary dummy program that is utilized in place of missing module known as ‘DRIVER’.
drivers
DRIVER