Monday 25 May 2015

Top 4 differences between Defect Priority and Severity

Difference between Defect Priority and Severity is one of the most confusing concept or term in software testing. Most of the organizations use the defect priority and severity attributes in their defect management combined whereas few may have either defect priority or severity alone.

Defect Priority defines the order or sequence in which defect should get resolved and the Priority status is set by tester while raising the defect with time frame details. It is the questionnaire to ‘Should developer fix it now, or can wait?’ If high priority is mentioned then the developer has to fix it as early as possible. 
Defect Severity defines the seriousness or business impact that a particular defect has on the system. Simply it means how seriously the defect is impacting on other parts of the application.
Important examples on Defect Priority and Severity combinations:
  1. High Priority and High Severity: An error occurred on the basic functionality of the application and does not allow the user to use the system. (E.g. An e-commerce portal, on placing the shopping order,doesn't add the items to shopping basket then this is high priority and high severity bug.)
  2. High Priority and Low Severity: The spelling mistakes or wrong placement of the company logo on the main/home page of an application.
  3. High Severity and Low Priority: An error which occurs on the functionality of the application and will not allow the user to use the system but on click of link which is rarely used by the end user such as Connect with us or Login using Facebook, Twitter, Google+ on the shopping portal.
  4. Low Priority and Low Severity: Any cosmetic or spelling mistakes which is within a paragraph of the e-commerce portal.  
Friday 22 May 2015

Defect Severity

Defect Severity defines the seriousness or business impact that a particular defect has on the system. Simply it means how seriously the defect is impacting on other parts of the application.
In general there are four different Defect Severity types or levels:
  1. Critical: Entire testing is affected and system is unable to use. All testing will be stopped till defect get fixed. No workaround exist to continue with testing.E.g. 404 Page not found, 500 internal server error.
  2. Major: Majority of the modules are impacted. Defect needs to be fixed as soon as possible. System cannot be used until fix is done. Workaround may be available to proceed with testing.E.g. Wrong implementation, Wrong calculation.
  3. Minor: Few of the testing modules are not working fine but testing can be continuing on other modules. The affected modules testing will be stopped until defect gets fixed. Workaround exist to continue testing. E.g. Wrong alignment, Inconsistency issues, spelling issues.
  4. Cosmetics: Cosmetic errors which has no impact on testing deliverable and schedule.E.g. Correction of the proper background colours and the themes of GUI, modification in error messages
Depending upon the Defect Severity, developers fixes the defect. The critical or major defects needs to be fixed as early as possible as these defects affects the business.

Tuesday 19 May 2015

Defect Priority

What is Defect Priority and types of defect priority?

Defect Priority is defined as the order or sequence in which defect should get resolved and the Priority status is set by tester while raising the defect with time frame details. It is the questionnaire to ‘Should developer fix it now, or can wait?’ If high priority is mentioned then the developer has to fix it as early as possible.
In general there are four different Defect Priority types or levels:
  1. Urgent: All the testing functionality is impacted and stopped. Such serious affecting defects needs to be fixed immediately.
  2. High: Majority of the testing functionality is affected and testing for this module is stopped. Such defects must be fixed before testing has completed.
  3. Medium: Some of the functionality is affected and should get fixed before the application or system goes in to production environment
  4. Low: These are cosmetics defects which should get fixed if time available.
Depending upon the Defect Prioritydevelopers decide when to fix the defect. For each defect raised by testing team, developer has to provide the SLA to fix the defect. 

Sunday 17 May 2015

Defect template or Bug template

Defect template is also known as Bug template.The defect reporting template has some list of attributes or columns names some which are mandatory. 
Defect template or Bug template may vary as per organization to organization. Below are the most common attributes used in defect template.

1.  Defect ID: In order to refer and access the specific defect easily, quickly and uniquely. The unique id is provided to the defect is called Defect ID.

2.   Defect Description: This section describes the issue with more clarity and details.

3.    Summary: This describes the description of the defect.

4.    Steps to reproduce: This section describes the steps to reproduce the identified defect. It provides the details in step wise.

5.    Test Case: It is the unique Id for each test case or step. In order to identify and access the test case easily whenever it is required. In ideal tester marks the particular test step of test case as failed and link the identified defect to the test case or test step.

6.    Actual result: The current issue description

7.     Expected result: The behaviour of application which is expected

8.     Module name: It contains the name of the module in which issue is encountered.

9.      Detected By: The name of the tester who has identified the issue. By default, It displays the name of the person who logged the defect in to the QC.

10.   Release name: The name of the release in which issue is identified.

11.   Build name: It contains the version of the released build.

12.   Project: It defines the name of the project in which issue is encountered.

13.   Priority: The Priority order or sequence in which defect should get resolved

14.   Severity: The Severity defines the impact of the defect on the system or application.

15.   Status: It contains the status of the raised defect.

16.   Assigned To: This describes the person who should be looking in to the issue.

17.   Detected on: The date on which defect is identified and raised.

18.   Remarks: It describes the status of the raised defect such as reason for failure.

Note: Some project might have more or different field name in Defect template or Bug template depending on the requirement.
E.g. Few projects might have just Severity field not the Priority field.

Wednesday 13 May 2015

Defect Life Cycle or Bug Life Cycle

What is Defect Life Cycle or Bug Life Cycle in software testing?


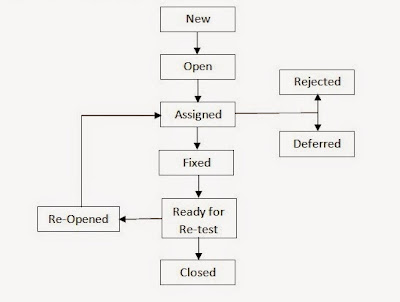
Defect Life Cycle or Bug Life Cycle is a cycle which a defect goes through during its lifetime. It starts when defect is found by testing team and ends when a defect is closed. 

Defect Life Cycle or Bug Life Cycle
Defect Life Cycle or Bug Life Cycle consist of below stages:
  • New: It is the first status of the defect. When the defect is identified and logged in bug/defect tracking tool for the first time, its status will be "New".

  • Open / Closed: After a tester has posted a defect, the testing team lead validates the defect. If defect is valid then he changes the status as "Open".  If the defect is invalid then the lead changes the status to be "Closed".

  • Assigned: After changing the status as "Open", the testing team lead assigns the defect to corresponding developer team lead and the defect status is changed to be "Assigned".

  • Rejected: If the developer feels that the defect is invalid and cannot be fixed then developer rejects the defect. Developer changes the status to be "Rejected".

  • Duplicate: If the logged defect is rectified as duplicate of any other defect then the defect status changes to "Duplicate".

  • Deferred: If the development team decides to fix the defect in upcoming release due to lack of time or the priority of the defect is low then he changes the state to "Deferred", which is later changes to "Assigned" when the defect is taken in consideration to be fixed for that release.

  • Fixed: Once the developer fixes the bug, developer assigns the bug to the testing team for next round of testing and changes the status of bug to "Fixed". It specifies that the bug has been fixed and is "Ready for Re-test" to testing team.

  • Ready for Re-test: Once the defect is fixed and the status is changed to "Ready for Re-test", the tester tests the defect. If the defect is not reproducible in the application, he put the appropriate comments in the bug/defect tracker tool.

  • Re-Opened:  Once the defect is fixed and status is "Ready for Re-test", the tester tests the defect. If defect is reproducible in the application, tester changes the status to "Re-Opened".

  • Closed: After the defect status is changes to "Rejected" or "Duplicate" or testing team not able to reproduce the defect in "Ready for Re-test" status, the testing team lead verifies the comments added by development team or testing team. When he is ensured with the comments he changes the status to "Closed".
After all open defects gets closed, tester needs to perform regression testing either on project level or release level on the application to ensure whether the fixed defect is impacting other functionality of the application or not.

Note: Above mentioned Defect Life Cycle or Bug Life Cycle  is generic to software testing industry. Some project might have more defect status such as Withdrawn, UAT migrated in.


Monday 11 May 2015

How to calculate Requirement Stability Index ?

Requirement Stability Index (RSI) is used to measure the changes in the business requirement added or deleted compared to the original requirements decided at the start of the project.

How to calculate the Requirement Stability Index:

Requirement Stability Index = (Total number of original business requirements + Number of requirements changed till date+ Number of requirements added + Number of requirements deleted) / (total number of original requirements)

E.g.
No. of Original Requirements
No. of Requirements Changed
No. of Requirements Added
No. of Requirements Deleted
Requirement Stability Index
100
15
5
5
1.25

Requirement Stability Index = (100+15+5+5)/100
                                              =1.25